A Pro Guide to Advanced Skin Retouching in DaVinci Resolve
When working with portraits or close-up shots, skin retouching is a common editing task. It reduces blemishes, softens wrinkles, and enhances overall complexion. This technique helps create a clean, professional look without losing the subject's natural character. In today’s time, where high-resolution content dominates social media, the demand for high-quality skin editing has grown more than ever. Most creators are familiar with DaVinci Resolve as a powerful tool for video editing and color grading. However, what many new users don’t realize is that it can also be used to edit photos. DaVinci Resolve can also perform detailed tasks, such as skin retouching. In this post, you’ll learn exactly how to use DaVinci Resolve skin retouching. By the end, you’ll understand how to smooth skin naturally and compare before-and-after results. Our aim is to give a clear, step-by-step process for using DaVinci Resolve to retouch skin.
Contents:
Part 1. How to Use DaVinci Resolve Skin Retouching
Skin retouching is an essential aspect of photo editing, particularly when aiming for professional portraits. It helps remove imperfections, smooth out even tones, and enhance picture details without over-editing. DaVinci Resolve is primarily known for being a video editing and color grading tool. DaVinci Resolve enables advanced skin retouching on still images using the Beauty FX filter. With its two main modes, Ultra Beauty and Automatic, DaVinci Resolve’s Beauty Fx filter allows smoothing, detail recovery, and texture adjustments.
Here’s how to do skin retouching in DaVinci Resolve:
Step 1: In DaVinci Resolve, import the photo and drag it into the Media Pool. Move to the Color tab to access all tools for color grading, correction, and effects. In the Effects Library, search for Beauty, then drag and drop the Beauty Fx filter onto your selected node.

Important Note: The effect isn’t available in the free version. Be sure you’re on the Studio version.
Step 2: Proceed to the Operating Mode and choose between Ultra Beauty and Automatic mode. Use Automatic for quick skin smoothing with minimal setup. Meanwhile, choose Ultra Beauty to access more sliders and options for precise editing.

Step 3: Proceed to the Smoothing section to adjust the level of skin softening. Keep values moderate for a natural result; too high may create an unrealistic plastic look. Additionally, adjust the Levels slider to control the amount of detail that remains visible.
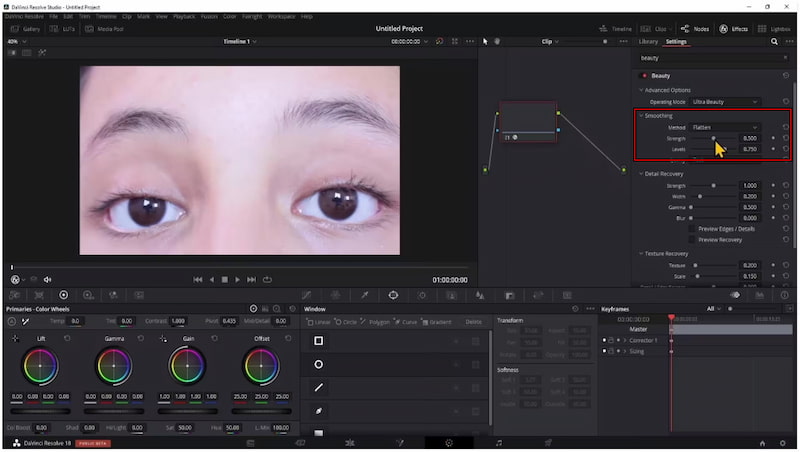
Creative Tip: Use the Opacity slider to blend the effect with the original image if it looks too strong.
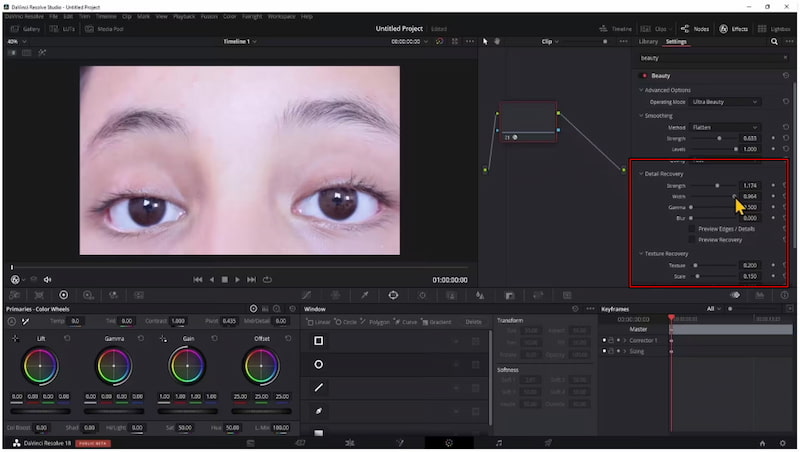
Step 4: Move to the Detail Recovery section to bring back important facial features. Adjust the Strength, Width, Gamma, and Blur to ensure the retouched skin still looks natural and sharp. Next, switch to the Texture Recovery to restore or reduce fine skin textures.
Step 5: Toggle the Beauty button to see your original vs. retouched version. Make fine adjustments until you find a balance that looks polished yet natural. Once satisfied, go to the Deliver tab and choose an export format to render and save the retouched skin.

DaVinci Resolve’s Beauty Fx filter makes skin retouching much more accessible. It allows you to choose between two modes: Ultra Beauty (for more customization) and Automatic (for quick results). Additionally, before-and-after comparisons are built in, allowing you to track progress.
Part 2. The Best Alternative to DaVinci Resolve Skin Retouching
DaVinci Resolve offers a Beauty FX filter that can be used to retouch skin, smooth imperfections, and restore texture. However, this feature is only available in the Studio version, which requires a paid upgrade. If you want a quick and easy way to retouch skin without investing in complex software, this can be a barrier. The best alternative to DaVinci Resolve skin retouching is Picwand AI Skin Retouch. It is an internet-based tool designed to streamline skin editing with just one click. It uses AI-powered high-frequency layering technology to automatically smooth skin and correct imperfections in seconds. It can remove various skin imperfections, including blemishes, scars, freckles, acne, and wrinkles.
Why Choose Picwand AI Skin Retouch:
• Skin retouching is completed in approximately 3 to 5 seconds.
• Keeps pores, texture, and realistic skin detail to avoid unrealistic results.
• Adjusts overall color and tone, and addresses issues such as dullness or uneven skin tones.
• Automatically detects imperfections, smoothes skin, whitens teeth, and corrects colors.
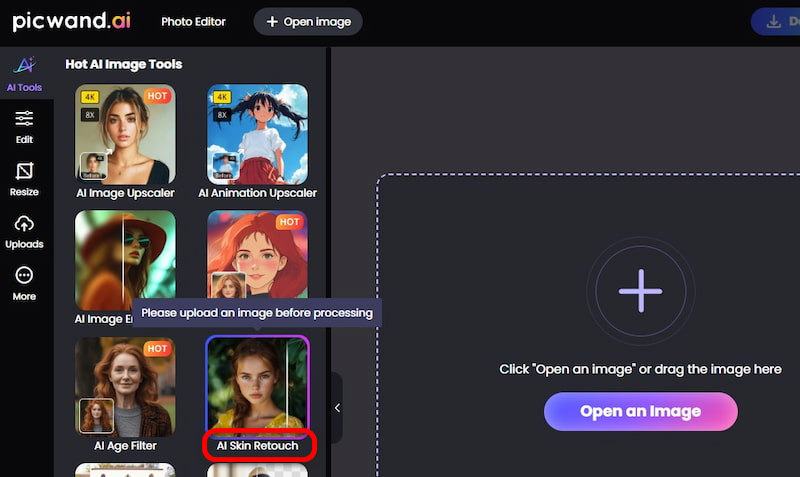
Step 1: Using a web browser, navigate to the official Picwand AI Skin Retouch page through the provided link. On the homepage, click Upload a Photo to add the image you want to edit. Remember to use a clear photo without heavy filters to achieve natural results.
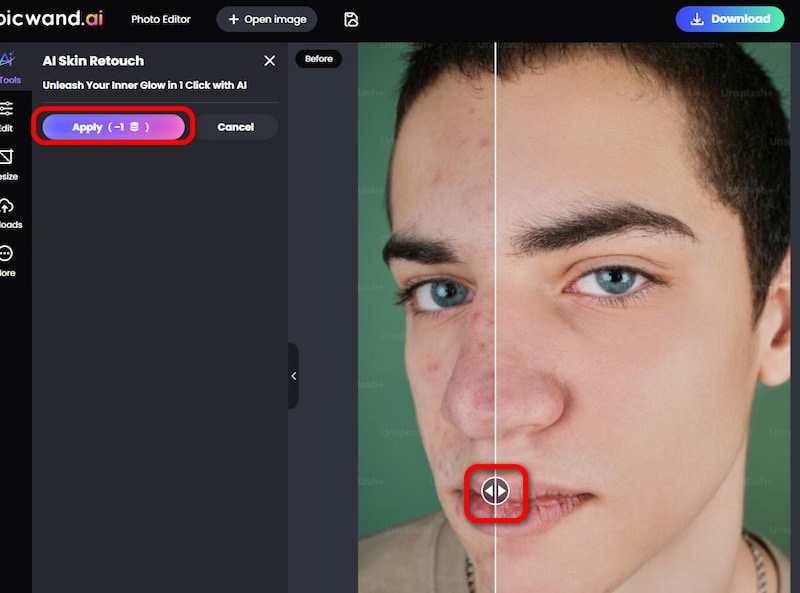
Step 2: Once the photo is added, the AI will automatically analyze the face. Within 3 to 5 seconds, the AI will remove any imperfections from your skin. You will notice that the skin is smoothed while retaining its natural texture.
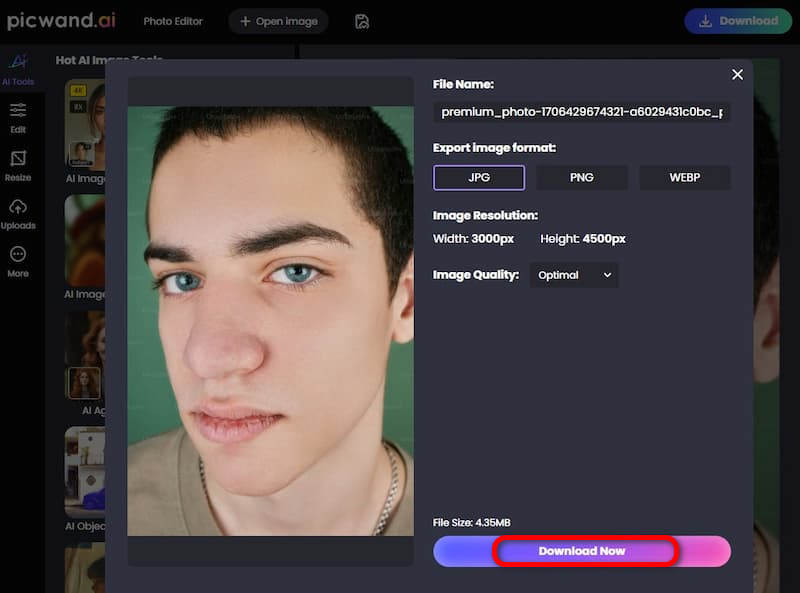
Step 3: View the before-and-after comparison directly on the interface. If you’re satisfied with the result, click 'Download' to save the retouched photo. Select your preferred output format and quality, then confirm by clicking Download Now.
Picwand AI Skin Retouch provides a faster, simpler, and more accessible solution for retouching imperfections. This smooth skin tool features one-click AI technology that enables smooth, natural-looking skin retouching in seconds.
Part 3. FAQs about Retouching Skin in DaVinci Resolve
Why does DaVinci Resolve reduce quality?
DaVinci Resolve may reduce quality if you are working with proxy files or a lower timeline resolution. By default, the software uses these lighter versions of your file to improve performance. However, this doesn’t affect your final render. When you export at full resolution with the right settings, the original quality is preserved.
How to remove blemishes in DaVinci Resolve?
To remove blemishes in DaVinci Resolve, the Beauty Fx filter is the most efficient option. After applying the filter in the Color tab, you can use the smoothing and detail recovery sliders to reduce imperfections. Also, you can combine this with the Power Window tool to isolate specific areas of the skin and apply targeted corrections.
Can you retouch skin on video in DaVinci Resolve?
Yes, you can retouch skin on video in DaVinci Resolve. However, similar to photo retouching, it requires the Studio version. The Beauty Fx filter is not available in the free edition. This filter smooths skin, reduces wrinkles, and maintains texture while adapting frame by frame. For advanced projects, you can also track faces and apply masks to limit retouching only to specific areas.
Conclusion
DaVinci Resolve proves to be more than just a video editor. It is also a capable tool for skin retouching in both photos and videos. With the Beauty Fx filter, you can smooth skin, reduce blemishes, and fine-tune texture to achieve realistic results. However, if you’re looking for a faster alternative for skin retouching in DaVinci Resolve, Picwand AI Skin Retouch is an excellent choice. With its one-click AI-powered technology, you can instantly remove blemishes, smooth skin, and maintain natural detail in seconds.
AI Picwand - Anyone Can be A Magician
Get Started for Free