Recover Images By Fixing Underexposed Photos in Photoshop
Getting the right exposure in photography is essential to ensure your image appears clear, bright, and detailed. However, despite all the knowledge, camera settings, and tools available, underexposed images can still happen. Fortunately, Photoshop provides several effective methods for correcting underexposed photos. It allows you to restore brightness, reveal hidden details, and enhance image quality. In this post, we will show you the two easiest ways for fixing underexposed photos in Photoshop. We will help you correct dark or poorly lit images effortlessly. This way, you can make them look naturally well-exposed without losing detail or color quality. By the end of this guide, you will learn how to properly restore the true beauty of your photos using Photoshop.

Contents:
Part 1. Fixing Underexposed Photos in Photoshop
Way 1. Correct Exposure, Brightness, and Contrast
There are moments when you capture what seems like a perfect shot, but the image turns out too dark. Instead of deleting it, you can actually fix underexposed photos in Photoshop. It offers several tools to correct underexposure and bring back lost details in your images.
Step 1: In Photoshop, drag and drop the underexposed image into the workspace. Navigate to the Image tab, click Adjustment, and select Exposure to open the Exposure dialog box. It contains three main sliders: Exposure, Offset, and Gamma Correction.
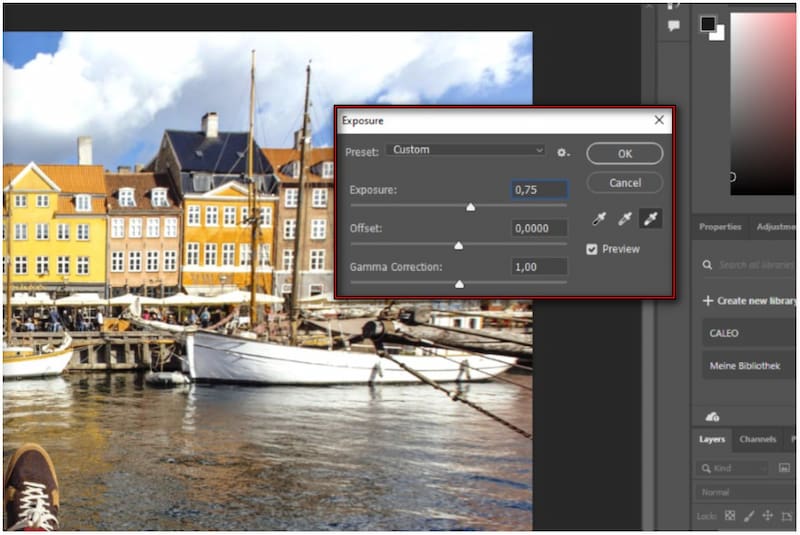
Step 2: Move the Exposure slider to the right to brighten your image, adjusting the highlights as needed. Then, use the Offset slider to adjust the midtones of the image to brighten midtones. Lastly, adjust the Gamma Correction slider to balance shadows and highlights.
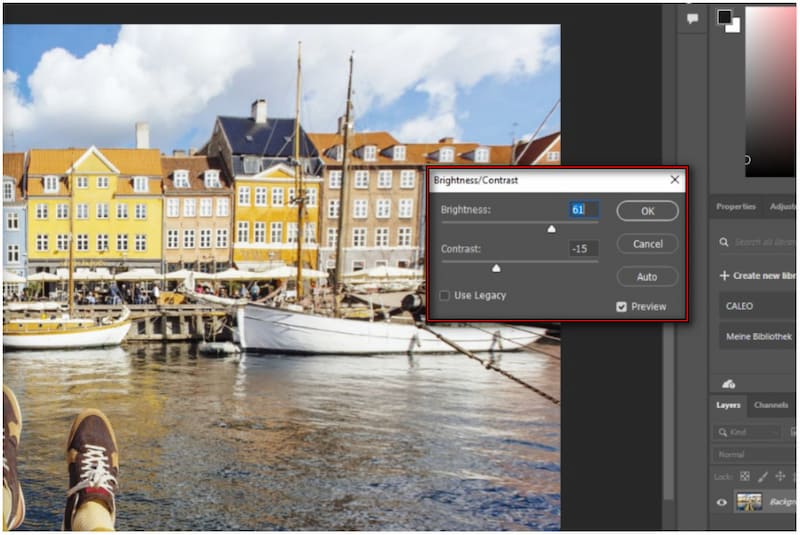
Step 3: For final touch-ups, switch back to the Image tab, click Adjustment, but this time choose Brightness/Contrast. Increase the Brightness slightly to make the image appear more vivid. Then, adjust the Contrast to prevent it from looking flat and avoid harsh shadows.
This method is highly effective for reviving dark images and restoring visual balance. You can independently adjust highlights, midtones, and shadows to recover lost details without degrading quality. However, it may look unnatural if the exposure is pushed too far.
Beyond fixing underexposed photos, you can also increase the image resolution in Photoshop.
Way 2. Multiply Blend Mode For Improved Exposure
Another quick and effective way to fix underexposed photos is by using the Multiply Blend Mode. It allows you to brighten dark images naturally without heavily altering their tones or colors. It works by layering the same image on top of itself and applying the Multiply blending mode.
Here's how to fix an underexposed photo in Photoshop:
Step 1: Right-click the initial layer and select Duplicate Layer to make a copy. The duplicated layer should appear above the original in the Layers panel. Otherwise, use the shortcut Ctrl/Cmd + J to duplicate the layer.
Step 2: Select the duplicated layer, then move the top of the Layers panel. Click the Blend Mode selector and choose Multiply from the pulldown menu. It will instantly brighten the photo and enhance the exposure, revealing more detail in darker areas.
Step 3: If the effect appears too subtle, you can duplicate the Multiply layer again. Conversely, if the image becomes too bright, reduce the opacity of the multiplied layer. It allows you to fine-tune the balance until the photo looks natural and well-exposed.
Tips:
To see the improvement, toggle the visibility of the top layer on and off. This comparison helps you notice how the Multiply Blend Mode brings out more light. Now, a small heads up: Stacking too many layers can cause the image to look overly bright.
Part 2. Best Alternative to PS - Picwand AI Photo Enhancer
Fixing underexposed photos in Photoshop is quick if you're proficient with adjustment layers or blend modes. However, these processes can be time-consuming if you're unfamiliar with such techniques. For a faster, smarter, and user-friendly approach, use Picwand AI Photo Enhancer. It is an AI-powered tool that automatically corrects underexposure, removes blur, and enhances image sharpness. In addition to fixing underposed photos, it also upscales images up to 8× their original size. It allows you to achieve resolutions as high as 4K. It supports various input formats, including popular formats such as JPG, JPEG, and PNG.
Why Choose Picwand AI Photo Enhancer:
• Removes blur, noise, and pixelation while preserving textures and fine details.
• Enhance images up to 8× their original resolution with clarity that reaches up to 4K.
• Instantly corrects brightness, contrast, and color to improve dark or low-light images.
• Automatically analyzes and corrects lighting, tone, and exposure issues with precision.
Here's how to fix underexposed photos in Photoshop alternative:
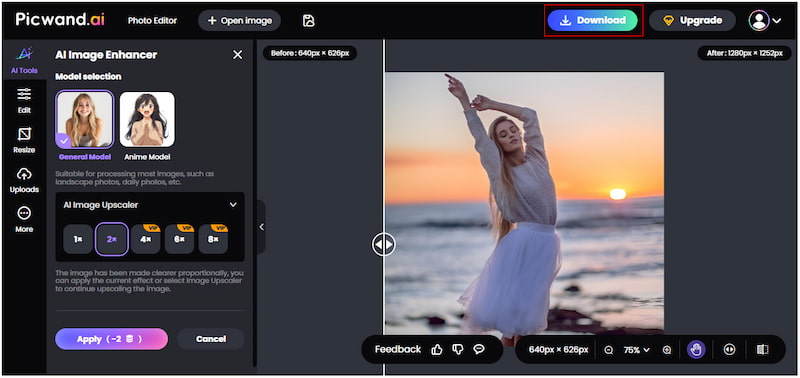
Step 1: Open a browser and navigate to the official Picwand AI Photo Enhancer site using the provided link. On the homepage, click Upload a Photo to add your underexposed image. The image will appear in the preview window, allowing you to assess its current lighting.

Step 2: Navigate to the Model Selection section and select General Model, which is ideal for most image types. Next, move to the AI Image Upscaler section to select your upscale level. You can choose from 1×, 2×, 4×, 6×, or 8× depending on your quality needs.
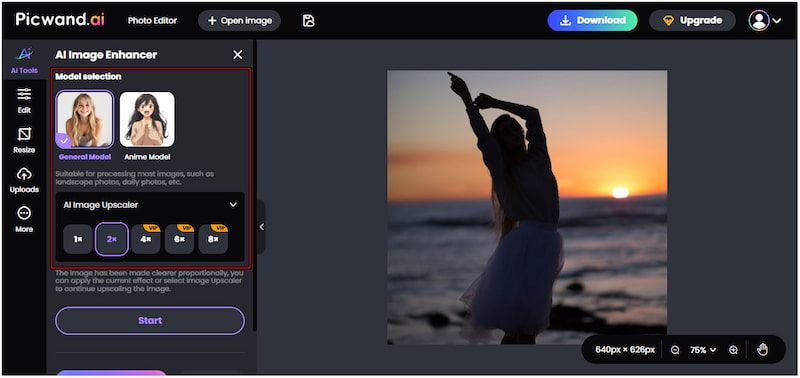
Step 3: Click Start to begin the enhancement. In a few seconds, Picwand's AI automatically brightens the image, sharpens details, and improves overall exposure. Click Apply to finalize the results, then hit Download to save the enhanced image.
Picwand AI Photo Enhancer is the best alternative to Photoshop for fixing underexposed photos. It's a one-click enhancement that automatically adjusts exposure, contrast, and color while restoring details and clarity. Beyond brightening, it also improves image quality up to 4K.
Part 3. FAQs about Fixing Underexposed Photos in Photoshop
Can Photoshop fix an underexposed image?
Yes, Photoshop can fix an underexposed image using the adjustment layer. You can correct dark or low-light photos by adjusting the Exposure, Brightness, and Contrast settings.
How to recover underexposed photos?
To recover underexposed photos, brighten the image while preserving its natural texture and detail. In Photoshop, this can be done by increasing the Exposure and Gamma Correction to reveal shadow details. Following that, adjust the brightness and contrast to fine-tune the tone.
How to avoid underexposed photos?
To avoid underexposed photos, it's essential to properly manage your camera's exposure settings before taking a shot. Always check your camera's exposure meter or histogram to ensure accurate exposure. Additionally, shooting in RAW format helps retain more image data.
Conclusion
Fixing underexposed photos in Photoshop is a reliable way to restore brightness and improve the quality of your images. By using tools like the Exposure Adjustment or the Multiply Blend Mode, you can quickly brighten dark photos. These methods provide precise control over lighting, allowing you to recover images that might otherwise seem unusable. However, for a faster and more automated solution, Picwand AI Photo Enhancer offers an excellent alternative. With just one click, you can automatically brighten your images, sharpen details, and upscale your photo to high resolution.
AI Picwand - Anyone Can be A Magician
Get Started for Free