Denoise in Photoshop to Remove Grain and Improve Quality
Digital noise refers to the random speckles, grain, or color distortions that appear in photos. It occurs because the camera sensor amplifies light signals, thereby increasing unwanted visual artifacts. As a result, images can look rough, gritty, or unclear. Many editors and photographers struggle to remove these imperfections without losing essential details. This post will teach you how to denoise in Photoshop to clean up noisy images. We will help you understand how Photoshop’s noise reduction feature works. Additionally, we’ll discuss the types of digital noise and share practical tips for reducing noise when shooting. This will help you capture clearer, higher-quality photos straight from your camera.

Contents:
Part 1. How to Denoise in Photoshop
Digital noise appears as grain, making the photo look rough and unclear. Fortunately, you can denoise images in Photoshop using the Noise Reduction tool. This feature helps reduce unwanted noise while preserving as much detail as possible. However, you should use this tool carefully to avoid losing fine details.
Step 1: In the Layers panel, right-click your original image layer and select Duplicate Layer. A dialog box will pop up, prompting you to name the duplicated layer. For our example, we will name it Noise Reduction, then click OK.
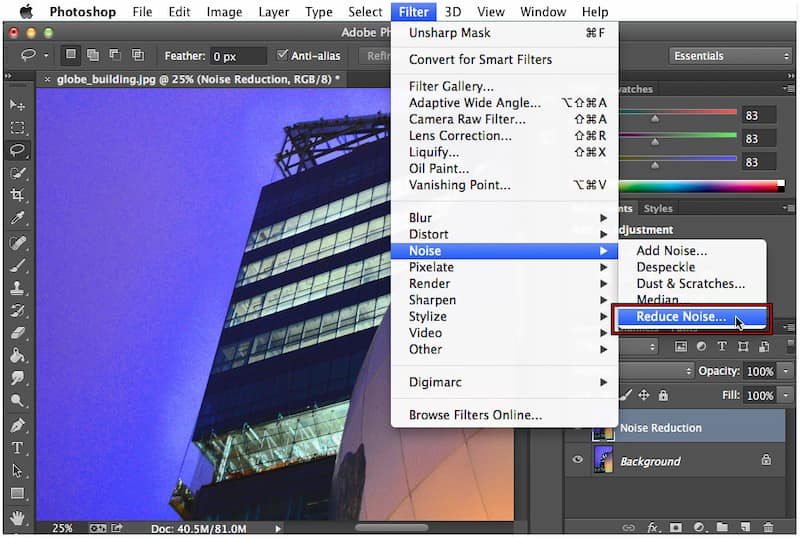
Step 2: With the duplicate layer selected, navigate to the top menu and click Filter. Select the Noise option from the pulldown menu and click Reduce Noise. A dialog box will appear showing noise reduction controls and a preview window.
Step 3: Photoshop provides several sliders to help you fine-tune your noise reduction results:
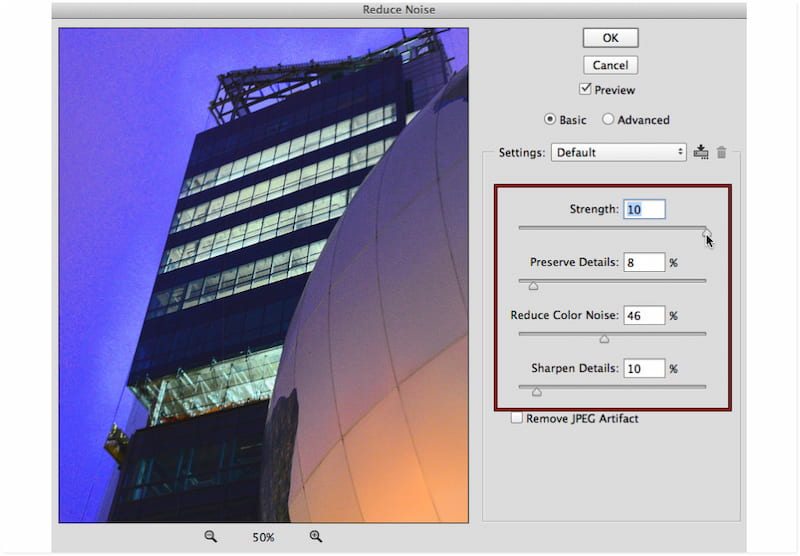
• Strength: This controls the intensity of noise reduction. Start with a high value to clearly see the effect, then reduce it to achieve a balanced result.
• Preserve Details: This option determines how much detail remains after noise reduction. Increase this value to retain more detail.
• Reduce Color Noise: This targets colored speckles caused by sensor noise. Raise its value to smooth color inconsistencies.
• Sharpen Details: This restores some of the sharpness lost during noise reduction. Use it cautiously, as too much sharpening can reintroduce grain.
Check this one to apply a different technique to sharpen an image in Photoshop.
Step 4: Keep toggling the Preview box on and off to compare the noise-reduced version with the original. If satisfied, click OK to apply the noise reduction effect to the duplicated layer. You can toggle the Noise Reduction layer's visibility to compare the before-and-after results.
That’s how to denoise an image in Photoshop using the Noise Reduction feature. Photoshop effectively cleans up noisy photos without damaging the original photo. However, overuse of the filter may lead to loss of fine texture, resulting in an unnatural look.
Part 2. Best Alternative to PS - Picwand AI Photo Enhancer
Not everyone has the time or expertise to denoise in Photoshop. If you want a quicker solution that automatically enhances images, we've got you! Picwand AI Photo Enhancer is the most talked-about image enhancement tool online. It is powered by the newly developed AI enhancement algorithms to instantly refine noisy images. It accepts various input formats, including JPG, JPEG, PNG, etc. This tool can enlarge photos up to 8× their original size and achieve resolutions up to 4K.
Why Choose Picwand AI Photo Enhancer:
• Upscales images up to 8× their original size with up to 4K resolution.
• Reduces noise in photos while preserving the image's original details.
• Efficiently improves brightness, contrast, and color in dark or nighttime shots.
• Adopts the latest AI enhancement algorithms to improve image quality in seconds.
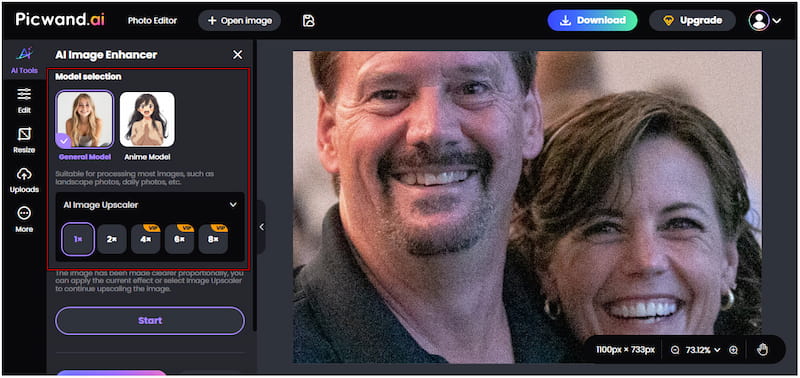
Step 1: In your browser, access the official Picwand AI Photo Enhancer page using the provided link. On the homepage, click Upload a Photo to load the noisy image you want to enhance. Once imported, your image will appear in the preview window.

Step 2: Under Model Selection, choose the General Model, which works best in various image types. Now, click the AI Image Upscaler option to select your desired upscale level. You can upscale your image by 1×, 2×, 4×, 6×, or even 8× for maximum quality.
Step 3: Click Start to let the AI begin enhancing your image. Within seconds, the tool will display a side-by-side preview showing the original and enhanced versions. If satisfied with the results, click Apply to finalize the enhancement. Finally, click Download to save the enhanced image.

Picwand AI Photo Enhancer offers an easy yet powerful alternative to enhance image quality. It automates the entire enhancement process using advanced AI algorithms. It can upscale images up to 8× and produce high-resolution results, up to 4K.
Part 3. Types of Digital Noise & Tips for Reducing Noise When Shooting
Digital noise refers to the random speckles, grain, or color distortions that appear in images. It can make photos look rough, patchy, or unclear, like static on an analog TV. While noise can add a stylistic effect, it’s undesirable in most professional or high-quality photography.
Types of Digital Noise
Luminance Noise: Luminance noise appears as random variations in brightness or light intensity across an image. It doesn’t affect color but makes the image look gritty or textured. It is common in low-light images or at high ISO settings, where the sensor amplifies light signals.
Chrominance Noise: Chrominance noise appears as random colored pixels scattered throughout the image. It happens when the camera sensor struggles to interpret color information correctly. This causes unnatural color spots and discoloration.
Banding Noise: Banding noise appears as visible horizontal or vertical stripes, usually in the sky or on walls. It is caused by the camera sensor's electronic circuitry. This reduces the image quality and is more difficult to remove during post-processing.
Tips for Reducing Noise When Shooting
Use the Lowest ISO:
ISO determines how sensitive your camera sensor is to light. The higher the ISO, the more noise your photo will have. Aim to shoot at the lowest ISO while maintaining proper exposure.
Proper Lighting:
Good lighting reduces the need for high ISO. Use natural light, reflectors, or external flashes to brighten your subject. Shooting in well-lit conditions can also minimize noise buildup.
Expose Correctly:
Underexposed images tend to show more noise when brightened later in editing. Use your camera’s histogram to ensure you’re capturing a balanced exposure.
Keep Camera Sensor Cool:
Heat increases noise in long exposure photography. Avoid continuous shooting for extended periods in hot environments. Let the camera rest occasionally to prevent overheating of the sensor.
Part 4. FAQs About Denoising in Photoshop
Can denoising remove all noise?
No, denoising cannot completely remove all noise from an image. However, modern AI tools like Picwand AI Photo Enhancer can significantly reduce visible noise.
What are the limitations of denoising?
The main limitation of denoising is the trade-off between clarity and detail preservation. Over-denoising can cause blurriness, flatten textures, and erase fine edges.
What is the difference between denoising and smoothing?
Denoising targets unwanted random noise caused by digital sensor interference or low light. Meanwhile, smoothing softens the entire image surface, reducing contrast and texture.
Conclusion
Reducing noise in Photoshop is an essential step in achieving clean, detailed, and professional-quality photos. By understanding how to denoise in Photoshop, you can effectively remove unwanted grain. But if you want a faster and more effortless way to enhance an image without manual adjustment, use Picwand AI Photo Enhancer. It automatically denoises, sharpens, and enhances your photos in just seconds.
AI Picwand - Anyone Can be A Magician
Get Started for Free